HOME| TEXT| GRADING | STAFF | DEMOS | LECTURES | LABS| ELECTRONICS| PROGRAMS

Making Printed Circuit Boards with Orcad Layout Part 6

(Hole sizes)

bullet

The company I use gives me 8 drill sizes that are free, and charges about $9.00 for an extra drill size, so adjusting some of the holes will could save lots of money.

Drill Number Set Drill Size Use
#70 0.028" via holes and fine lead parts
#65 0.035" IC's, 1/4 watt resistors
#58 0.042" TO-220, 1/2 watt resistors
#55 0.052" Large connectors
#53 0.060"  
#44 0.086" TO-220 Mounting holes
1/8" 0.125" 4-40 screws
#24 0.152" 6-32 screws


bullet

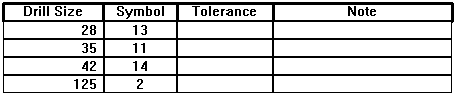
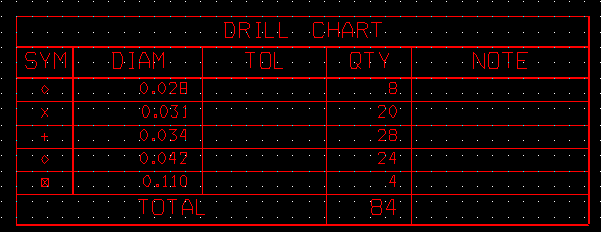
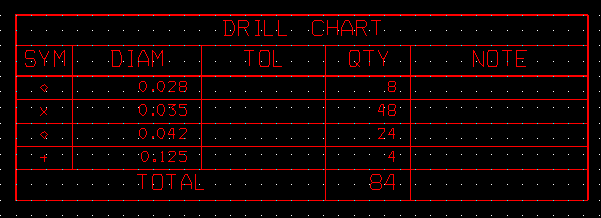
From the Drill Chart below there are 48 holes sizes 0.031" and  0.034".  I will shift them up to a size 0.035".

bullet

The 0.110" holes will become .125" and the 0.028" & 0.042" I'll leave alone.

bullet

One method of doing this is to modify the the footprints and replace the pads with different pads from the pad library.
bullet

This is good if you want to create new footprints for parts that you want to use again in the future.

bullet

One problem is that this is very time consuming.

bullet

The second way is to modify the padstack local library from the spreadsheet.
bullet

Go to Tool -> Padstacks -> Select From Spreadsheet...

bullet

Cancel the "Select Padstack" dialog box.

bullet

The spreadsheet shows all 84 holes with all it's layers (even those that are unused).

bullet

Scroll down the spreadsheet and locate the number 31or 34 (stands for 0.031",0.034") under the "Pad Width" & "Pad Height" column and the "DRLDWG" AND "DRILL" layers.

bullet

In the pad above, double click on each of the "31"s and change them to "35"s

bullet

Lastly make sure the TOP" and "BOTTOM" layers within the padstack are larger than 35.

bullet

This one is 52, so we are okay.  This will the plating that is seen on the top and bottom of the board, around the hole.

bullet

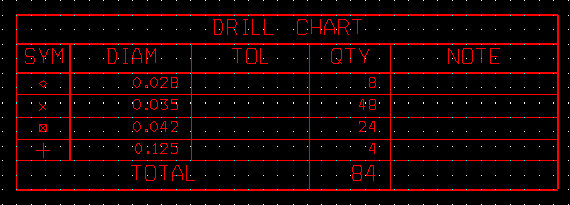
Now let the Drill Chart update by going to Tool -> Drill Chart -> Properties, then press "OK".

bullet

If you got all the padstacks, then the unwanted sizes should vanish.

bullet

From the Drill Chart, the "SYM" or symbol column needs to have a unique symbol.
bullet

Go to Tool -> Drill Chart -> Select From Spread Sheet...

bullet

Double click the number you want to change, and replace it with an unique number 1 - 20.

bullet

There are 10 styles of symbols in two different sizes.  1-10 (Large) 11 - 20 (Small).  Large holes (0.125") I'll make a large symbol.

bullet

To see the symbols in action hide all layers except "Global Layer", "SST" & "DRD".  Hide the layer by selecting it from the pull down menu in the tool bar, and press "-" key.  Select the "DRD" layer last so the symbols are on top.

Go to "Making Printed Circuit Boards with Orcad Layout Part 7"

Last Modified:  10/04/04
MAE433 WEBMASTER

[ MAE224 ] [ MAE412 ]